.

Showing posts with label Desserts. Show all posts

11.7.11

Lemon Strawberry Jar Cakes

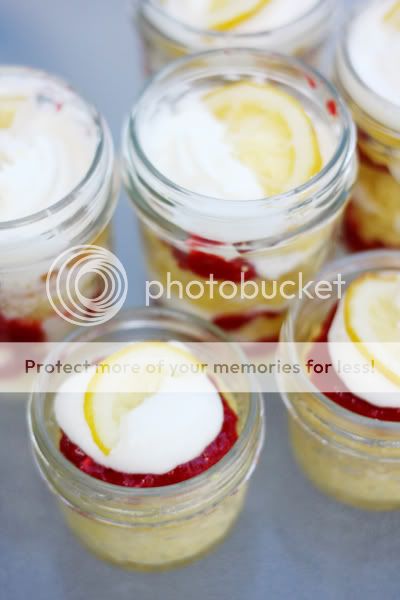
I've been drooling over some mason jar cakes on Pinterest lately and finally decided to try it out. I made these up for Mom's birthday last week, and they were delicious and quite the hit. They were a lot easier to bake than I imagined,....
....of course that is after I learned how NOT to make them.
I've included the "Easy, not crazy" recipe and directions as well as my Do's and Don'ts.
While these are delicious and cute I think my favorite part is that they are portion controlled and contained in a jar which is nice for messy kids (not that it really helps either THAT much.) Here it is, Enjoy!


Lemon Strawberry Jar Cakes

Cake Ingredients
1 box lemon cake mix
1 small lemon jello instant pudding mix
4 large egg whites
1 cup sour cream
1/2 milk
1/3 cup oil

Buttercream Frosting Ingredients
1/2 cup shortening
1/2 cup butter
1 tsp vanilla
4 cups confectioners sugar
2 tbls Milk

Berry Filling Ingredients
Thick strawberry (or raspberry) Jam

Candied Lemons Ingredients**
(totally not necessary)
2 lemons thinly sliced
1 cup sugar
1 cup water

If you are going for the gold and making the candied lemons, they need to be made a day or two in advance (I had no idea). Boil sugar and water in a sauce pan over medium heat. Place slices in pan and simmer for 5-7 mins. Place lemons on cooling wrack and cool until hard. )A really long time.)

To the cake:
Preheat oven to temp indicated on your box cake. Mix cake ingredients for 2 mins. on medium setting. Fill sprayed and floured mason jars half way with batter. Place jars in a 9X14 pan that is filled with a 1/4in of water. Place in oven and cook for 30-45 mins (depends how large your jars are, the small ones I did took 30mins, the 1/2 pint jars took 35. Insert fork and just test every 5 mins to see when done.)

While cake is cooking make your frosting. Cream butter and shortening together then add sugar,vanilla and milk. You might need to add more sugar or milk to thicken or thin. Place in fridge while waiting for cake to cool.

Once your cakes are done place jars on a cooling wrack and wait until they are 100% cooled. If you decide that just spooning jam and frosting on top isn't "cool" enough or rather the cake to frosting ratio just won't cut it, then you can be ambitious and layer. Knock the cake out of the jars. You'll have to rewash the jars as they are all crumby and not nice looking. Cut cakes into 4ths, place one layer into jar, spoon in a dollop of jam then frosting, place next cake slice and repeat with dollops and layers. Top with frosting and lemon slice.
Walahh.

Sometimes I get a little too ambitious, this was one of those times.
You got the "easy" recipe, keep it that way. Here are the Do's and Don'ts I learned on the first go around of these delicious cakes.

DO stick to a recipe.
DON'T think that because you don't stick to recipes while cooking you can do the same thing while baking. Baking and cooking are totally different.

DO use milk when the recipe calls for milk.
*DON'T use whipping cream in place of milk thinking that it is "heavier" and "yummier" and therefore will make the cake taste better.

DO use jam for your berry filling.
DON'T try to make your own berry filling, especially DON'T use cornstarch and gelatin to thicken your mashed up strawberries.

DO start with a small amount of milk *not whipping cream* when mixing your frosting, add more later if you need to thin.
DON'T dump in a large amount of milk all at once and then have to use an entire bag of powdered sugar to thicken resulting in a week of frosting sitting in your fridge and you eating a spoon full every time you enter the kitchen.

In the end, this CAN be super easy, make it that way.
(No this isn't a cooking blog but yes I have been cooking whole lot lately, hence the posts.)
Enjoy.

i linked on:
The Girl CreativeSumo's Sweet StuffMaking Monday Marvelous Linky PartyKeeping It Simple
topsy turvy tuesdaysTickled Pink at 504 Main
lil luna link party buttonSomewhat SimpleHookingupwithHoH

24.6.11

4th of July and Flag Jello


First and foremost:
4th of July is my most favorite holiday, and I am SOOO excited for it this year. I'm not sure why but it has always been my favorite holiday. Maybe it it the sense of community, or that it is the pinnacle of summer, or you get to lay around all day and do nothing if you want, or maybe I've just always had REALLY great 4th of July's. It's probably a combination of all of the above tied with the fact that there isn't ever that much expectation that comes with this holiday, so whatever happens can be fabulous. I have yet to be disappointed on a 4th of July.
(knock on wood.)

Secondly:
I'm not typically a cutesie-make jello into crazy holiday caricature or turn cotton balls into various woodland christmas creatures- type. But... the 4th of July rocks, and deserves Jello, and preplanning. This is the first year that I have actually had time to decorate and think about and plan for this fabulous holiday.. and I WILL go all out.

Thirdly:
I'm not a recipe writer... I'm a photographer. Try and stay with me, I hope the photos help immensely.

Flag Jello

4 (3 oz) packages of some sort of red jello
3 (3 oz) packages of blue jello
4 packets of KNOX Gelatin
1 can sweetened condensed milk
Lots of Boiling water

Blue Jello:
Mix your 3 packages of Blue Jello with 1 package of KNOX and 3 cups Boiling water. Mix until all is dissolved and then pour the entire contents into a 9x14 GLASS dish. *the dish NEEDS to be see through, you will understand why at the end*
Set in refrigerator and let sit for 30-45 mins (this depends on how cold your fridge is, mine took 40.)

While your blue Jello is setting prepare red and white jello.

White Jello:
Mix 1/2 cup COLD water with 2 packets KNOX, let sit for 2 mins. In another bowl mix 1 cup BOILING water with your sweetened condensed milk. Then mix 1/2 cup BOILING water to your gelatin mix. Once Gelatin is all dissolved, mix with Milk Mixture. Set aside.

Red Jello:
Mix your 4 packages of red jello with 1 package of KNOX and 4 cups Boiling water. Mix until all is dissolved. Set aside.


Because you will be using both the RED and WHITE over a long period you need to keep it semi warm so that it does not set. AFTER both had cooled a significant amount I simply put the 2 bowls in a sink of warm water.


Take out your Blue jello from the fridge after it has set enough to not leave on imprint when you touch when your finger to it. Get a sharp knife and run under hot water. Cut Horizontally across the pan, 1 inch strips. If you run your knife under hot water after each cut it cuts much more smoothly. Now....remove every other strip of jello.


Add 3tbl of red jello to each empty strip.

Place back in fridge for 15 mins or so take out when jello passes the finger indent test.
Add 3 Tbls of the white jello to each strip containing just red. (If this doesn't bring it right up to the same level as the blue jello you can either add more white or place back in fridge and add another layer of red until it evens out.)

Once again, place in fridge.. you know the drill....
*at this point your jello should all be the same level.*
once set, Add 1 and 1/4 cup of red jello... this will cover your entire pan
Let set in fridge
Add 1 and 1/4 cup white jello
let set
Red
White
Red
White

Until you run out.


Let set at least another Hour or so before cutting to make sure all of the layers are jello-ed together and well set... waiting longer will probably be better.


Check out the side of your pan, start cutting horizontally where the blue begins. Cut on that same side of the blue on every strip of blue. Then cut jello vertically, I like "flag sized" pieces so I kept them about 1/2 inch apart.

See the flag? Its upside down but it is there! Cut out, flip over, serve on dish and walah!!!
You are eating our US flag...
YUM.


You better believe there is another DIY for the 4th coming next week.. maybe even 2...

I linked on:
topsy turvy tuesdayslil luna link party button
Somewhat SimpleTransformation Thursday
504 MainJoin  us Saturdays at tatertotsandjello.com for the weekend wrap  up           party!A Little Knick Knack
The Girl CreativeSumo's Sweet Stuffcraft
Making