.

Showing posts with label DIY. Show all posts

15.8.11

Wool Dryer Balls. Felted Yarn Balls :: DIY

I started making these after learning to make my own Laundry Detergent. They are handmade, "green" and good for those kiddos that have extra sensitive skin. They go right in your dry cycle with your clothes to replace dryer sheets. They work wonderfully and I hear they last for years and years and years. Not only do they keep the clothes static free, if you use enough of them in one load it will cut your drying time in half in some cases. I typically throw 5 to 10 balls with each load, depending on the size of the load. They are incredibly easy to make, so much so that I will spare you a lot of directions and let the photos do the talking.


You need yarn that is 70% wool or higher. I suggest using a yarn that is thicker, the thinned stuff didn't felt as well. Start by making your core. Wrap tightly!


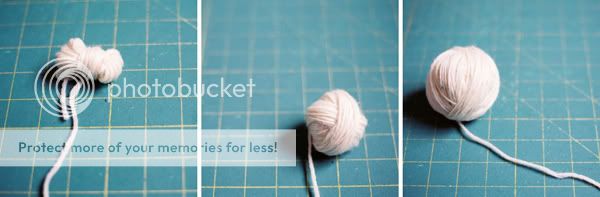
When finished this should be 3-4 inches diameters in size.
You are now going to felt your yarn balls. Put yarn balls in a nylon, placing a knot tightly between each ball. You can do this by washing or boiling the yarn. I opted for washing as it was much easier. Put in your washer on high heat and run a cycle, soap free. Then throw it in your dryer with a few towels and run for 2-3 dry cycles. Your yarn is now felted together and cannot be unwoven!

Now for the outer layer. Knot your first go around together and just start wrapping.
The ones we made were quit large, about 10in diameters round. 7 is plenty big, and you will save yarn doing them a touch smaller.
Felt again. Back in Nylon, wash then dry.
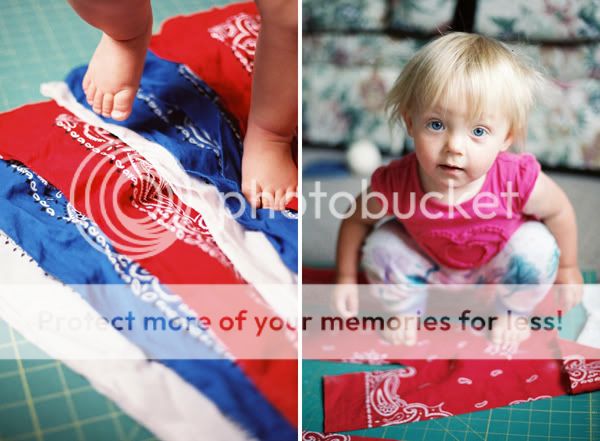
If you can find a toddler to help you with all of this then you get to rewind the same ball or yarn over and over, it is quite find and I highly recommend it *cough cough*.

This is the "if you don't wind it tight enough or put a tight enough knot in the nylon your yarn will fall out of place and it will look like this" photo. So don't do that. Wind tight people, TIGHT.

The finished product!
Place in the dryer with your wet clothes and let them work their magic. Funny how gorgeous they are as well. I made a bunch of extra along with some super small ones and they sit on my table as a center piece. I'm sure there are a million crafty and decor things that could be done with this concept. Link if you have photos or ideas for these. I'm curious as to what has been done.
Questions about this DIY? Did I leave something out? Comment and let me know!

1.8.11

Salvaging Tom

My feet haven't seen the inside of another shoe since April (not counting church).
I LOVE these silly shoes and wear them everywhere (minus the above mention church.)
I was pretty devastated when my big toes started peaking through the large holes they had created a few weeks ago. Solution? Just cut them off.
Hellooooo Toeless Toms!


I think I love them even more.

Linked on:
The Girl CreativeSumo's Sweet StuffMaking Monday Marvelous Linky Party
I'm topsy turvy tuesdaysCreative Itch
lil luna link party button
HookingupwithHoH

1.7.11

Bandana Pleated Flags

I have to say I have the cutest place on state st. right now. Seeing how a Junior High, a Church and Wendy's are my neighbors, there isn't much of a competition ... still...it is really cute.

I adore pleated flags and my place is the perfect set up for them but A: they are like 15-25 $'s at the store.. each! and B: I could not find a tutorial how to make them myself any where online. As simple as it may seam (hahaha... oohhh), I am NOT a sewer by any stretch of the imagination and it was the measurements that intimidated me. You have to have the right width to the right length in order for it to hang just right, and I wasn't about to bust out a calculator.
****So the "how to"***
So I did the lazy thing. I purchased a bunch of Bandanas (.99 at Hobby Lobby) cut them into 4ths, sewed them all together, and hoped the width/length would be just right.
They totally were
What is great about using bandanas is they are pre measured so you don't have to get our your board or roller cutter out at all. I just folded them in quarters and cut at the creases. Easy.
Sew the matching colors together first to make long stripes and then sew the stripes on top of one another. The sewing is by no means precise. The edges where all off so I had to go back and cut and hem them (which I really didn't need to do), and my "pleating" was me just folding the fabric over as I sewed. I pleated that top edge 3 times, each time with the pleats getting smaller and smaller. I didn't use a single Pin. No need to with a project like this, it doesn't have to be perfect.
The key to this project is seriously to THROW IT TOGETHER. I think I spent 10mins on my last 2 (the first time it took me some time to realize it didn't matter.) No need to make it perfect, no need to stress. It will be up for a few weeks, outside getting thrashed, and then in a bin for the rest of the year. Plus no one is looking at it closely to say "wow sharon, you really messed up on the hem".. like they would say that anyway...
I'll be back on the 5th with photos from some weddings, family sessions and I'm sure some dinners or something or the other.
Be safe and have a fabulous holiday! Happy 4th of July!

24.6.11

4th of July and Flag Jello


First and foremost:
4th of July is my most favorite holiday, and I am SOOO excited for it this year. I'm not sure why but it has always been my favorite holiday. Maybe it it the sense of community, or that it is the pinnacle of summer, or you get to lay around all day and do nothing if you want, or maybe I've just always had REALLY great 4th of July's. It's probably a combination of all of the above tied with the fact that there isn't ever that much expectation that comes with this holiday, so whatever happens can be fabulous. I have yet to be disappointed on a 4th of July.
(knock on wood.)

Secondly:
I'm not typically a cutesie-make jello into crazy holiday caricature or turn cotton balls into various woodland christmas creatures- type. But... the 4th of July rocks, and deserves Jello, and preplanning. This is the first year that I have actually had time to decorate and think about and plan for this fabulous holiday.. and I WILL go all out.

Thirdly:
I'm not a recipe writer... I'm a photographer. Try and stay with me, I hope the photos help immensely.

Flag Jello

4 (3 oz) packages of some sort of red jello
3 (3 oz) packages of blue jello
4 packets of KNOX Gelatin
1 can sweetened condensed milk
Lots of Boiling water

Blue Jello:
Mix your 3 packages of Blue Jello with 1 package of KNOX and 3 cups Boiling water. Mix until all is dissolved and then pour the entire contents into a 9x14 GLASS dish. *the dish NEEDS to be see through, you will understand why at the end*
Set in refrigerator and let sit for 30-45 mins (this depends on how cold your fridge is, mine took 40.)

While your blue Jello is setting prepare red and white jello.

White Jello:
Mix 1/2 cup COLD water with 2 packets KNOX, let sit for 2 mins. In another bowl mix 1 cup BOILING water with your sweetened condensed milk. Then mix 1/2 cup BOILING water to your gelatin mix. Once Gelatin is all dissolved, mix with Milk Mixture. Set aside.

Red Jello:
Mix your 4 packages of red jello with 1 package of KNOX and 4 cups Boiling water. Mix until all is dissolved. Set aside.


Because you will be using both the RED and WHITE over a long period you need to keep it semi warm so that it does not set. AFTER both had cooled a significant amount I simply put the 2 bowls in a sink of warm water.


Take out your Blue jello from the fridge after it has set enough to not leave on imprint when you touch when your finger to it. Get a sharp knife and run under hot water. Cut Horizontally across the pan, 1 inch strips. If you run your knife under hot water after each cut it cuts much more smoothly. Now....remove every other strip of jello.


Add 3tbl of red jello to each empty strip.

Place back in fridge for 15 mins or so take out when jello passes the finger indent test.
Add 3 Tbls of the white jello to each strip containing just red. (If this doesn't bring it right up to the same level as the blue jello you can either add more white or place back in fridge and add another layer of red until it evens out.)

Once again, place in fridge.. you know the drill....
*at this point your jello should all be the same level.*
once set, Add 1 and 1/4 cup of red jello... this will cover your entire pan
Let set in fridge
Add 1 and 1/4 cup white jello
let set
Red
White
Red
White

Until you run out.


Let set at least another Hour or so before cutting to make sure all of the layers are jello-ed together and well set... waiting longer will probably be better.


Check out the side of your pan, start cutting horizontally where the blue begins. Cut on that same side of the blue on every strip of blue. Then cut jello vertically, I like "flag sized" pieces so I kept them about 1/2 inch apart.

See the flag? Its upside down but it is there! Cut out, flip over, serve on dish and walah!!!
You are eating our US flag...
YUM.


You better believe there is another DIY for the 4th coming next week.. maybe even 2...

I linked on:
topsy turvy tuesdayslil luna link party button
Somewhat SimpleTransformation Thursday
504 MainJoin  us Saturdays at tatertotsandjello.com for the weekend wrap  up           party!A Little Knick Knack
The Girl CreativeSumo's Sweet Stuffcraft
Making